|
To install the client, select your render machine and run the nodesetup exe. The BNR Client can be installed on
any computer on the network.
(For LightWave - The Client will run the lwsn.exe from the shared network directory - so Lightwave doesn't need to be installed on this machine.)
Simply follow the prompts in the installer. You only need one client on a machine as the client can host
multiple RenderNodes. When the client is run for the first time it will need to be configured.
To configure the client, launch The BNR Client (if not already running) and right click the
butterfly icon that appears in the system tray (windows OS).
Select the 'configure' option from the pop-up list.
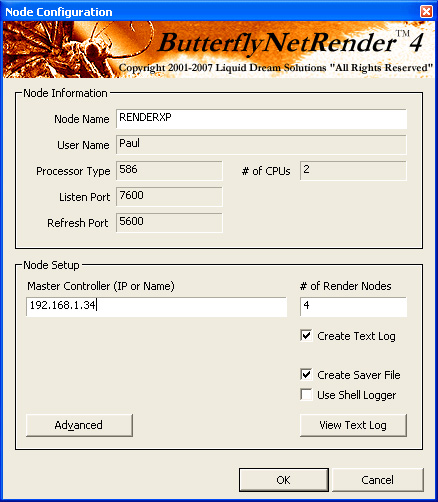
Windows Configuration:
Make sure the Client Name to a Unique name (Each Client must have a different name). Enter the User name and the 'Number of Processors this machine has'.
Set the Local Controller (IP or Name)
Set the Number of RenderNodes (I suggest you set 1 per CPU)
Set the 'Create Saver File' to let the BNR Client interact with the BNR screen saver
(This is a feature that can 'enable' a BNR Client when the Screen saver becomes active)
The 'Create Text Log' is used to trace system setup issues - You shouldn't have to turn these on.
(If so - the bnetnode???.log will be stored in the Application common directory:
and the ??? is the 3 digit day of year)

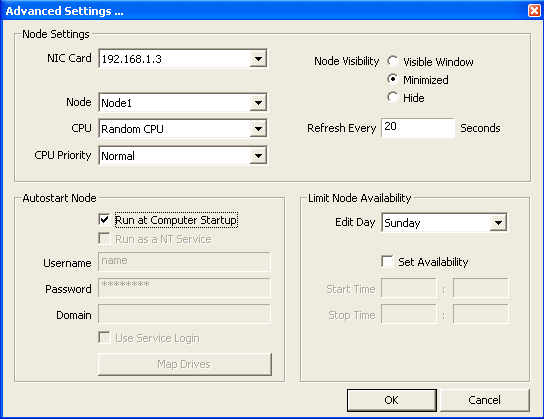
Advanced Settings:
You can change the Prioirty and Displaying of the Client Shell when its rendering a frame..
You can also Select Which CPU the RenderNode will use. This can be used to make a DUAL machine use only 1 CPU when its configured as a Single Rendernode client.
The 'Auto Refresh Seconds' is the number of seconds the Client will try and reconnect to the Controller when its disconnected.
The NIC: xxx.xxx.xxx.xxx is the current selected Network Card to used for this Client. If the machine has more then 1 Network card - make sure you select the correct network that the
Controller is running on.
You can also set a Limited use of this client based on Day of Week and Time
To Run the Client as a NT Service - Select the 'Run as a NT Service'
I
MPORTANT: In the Windows Control Panel->Services - Select the 'BnetService' and make sure you add the option for it to Login. This will make sure the Service can access the network drives.
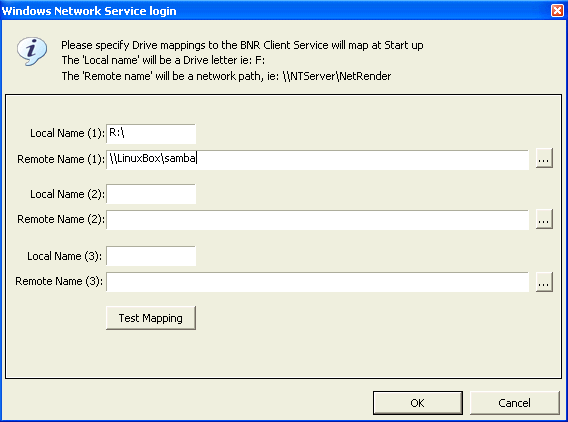
You may also need to use the 'MAP Drives' option in the BNR Client
(This is used to Map the network drives when the Service logs in):

|
