Setup Network


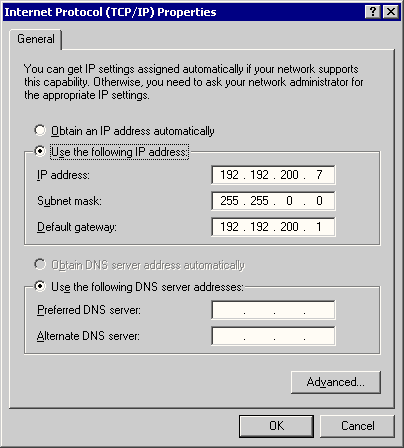
Setup Windows Networking with TCP/IP Addresses:

    For full details on TCP/IP Networking, see your windows help files. TCP/IP stands for Transmission Control Protocol/Internet Protocol. It is the default wide area network protocol that provides communication across diverse interconnected networks.

    In order to use TCP/IP your computers are going to need network cards and connections to each other. Assuming you have a viable network situation hardware wise the next thing to do is set up the TCP/IP.

    In order to do this you will need to get the properties of your network card, which can be found in the windows control panel. Once open click the install button and select the Protocol component TCP/IP to install. OK the
    selections till you are back to the properties of your network card.

    Double click the newly installed TCP/IP protocol. You should see a window like the one below.


    In order for your machines to be able to talk to each other they need a unique network address, the IP address. The IP address is like a telephone number.

    When a computer wants to talk to another computer it dials the relevant IP address and leaves its IP number so that the contacted computer knows which machine is trying to contact it and where to send any requested data. The IP numbers come in 4 blocks the first three of which must be identical on all machines.

    The last block would carry the unique number. In the example above this machine is number 7 of the 192.192.200 network. There is a specific set of IP addresses that are reserved for LAN's so as not to conflict with Internet exposed IP addresses of fixed domains. Check your windows documentation for further details.

    If you are running a domain server too you will have to set the default gateway that the computer will use. The default gateway is the IP address of the domain controller. In the example above the domain controller is machine 1 on the 192.192.200 network. Unless your network is massive you will not need the sub set mask, if your network is that large you should be getting your TCP/IP information from somewhere else!


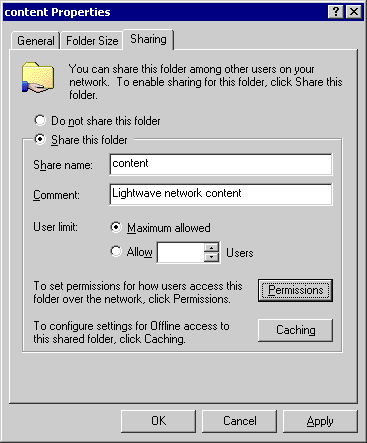
Setup a Shared Network Directory:

    The final part of your network is the network directory. A network directory is just like any other directory on your computer. The only difference is that it is unlikely to physically be on your computer. It is more likely to be on another networked machine. Network directories are used for holding project data in a place that is easy for multiple user's to get at and work on. The Lightwave content folder is an excellent example of a folder that would benefit from being a shared directory. 

    (NOTE: this is from a Windows 2000 setup, Windows 98 or Windows XP will be a little different)
     

Sharing a folder:

    In order to make a shared directory firstly find/create a folder that you want to share and right click it and select the Sharing option. The following window will open up. Click the Share this folder button and name your folder, allow the maximum users. (see above)


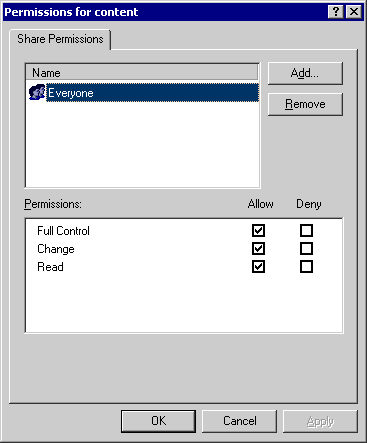
Permissions for folder:

    The file has now been exposed to the network but (if you have a domain controller) no one is able to use it yet because they will need permission to access the folder. Select permissions and the following window will open.

    Enable other users to create and destroy files in the folder. (see above)
     

For more information on network security and permissions check with your network supervisor or the windows help files. Any further information is beyond the scope of this document.

 ButterflyNetRender 4.0 User Guide